pecan nut shortbread... memories from my granny

These are my favourite biscuits ever!  Not only are they a delicious short bread with a dusting of icing sugar for sweetness and pecan nut for crunch, but they are also the biscuits my granny used to make for me when I went to spend holidays with her on her farm.  I remember the old biscuit tin they were kept in, drinking sweet hot tea out of my "small" Spode teacup, the cool feeling of slate underfoot and the smell of hot, dry, dusty highveld air.  Treasured memories of the place I most loved being when I was small.

Recently I made them with Miss J for the first time, you can see her "helping" me with the butter.  It is a great recipe to make with children because the dough is rolled into little balls, perfect for little hands.  To make you own follow the simple recipe below, and enjoy.

Ingredients:
  • 2 cups of plain flour
  • 250g butter - softened to room temperature
  • teaspoon of vanilla essence
  • 1 packet (80g) pecan nuts - broken into pieces
  • 4 heaped tablespoons of icing sugar
  • icing sugar for dusting (around 2 cups in all)

To make:
  • Cream butter and sugar until well blended 
  • Add vanilla essence & blend
  • Add flour and mix until a rough dough forms
  • I do all the steps above in my food processor
  • Add the pecan nuts and mix the dough gently until all flour is blended.  Be gentle, this dough doesn't like to be overworked.
  • Roll into bite size balls.
  • Place in an oven preheated to 200C and bake until they are golden but not brown - around 20 minutes.  
  • Allow to cool
  • Once totally cool roll in icing sugar and store in a well sealed jar or tin

Now simply enjoy with your tea or coffee.  Mmm mmm

Found the lovely birdie cookie jar at my favourite $2 shop.  I am going to take it to the cottage on our farm to store holiday biscuits for my own children, hopefully creating the holiday biscuit memories all over again.

mid winter...in the country

I can't wait to be back beside the fire at the cottage this winter.  A good place to spend  a winter's evening.

Lots of projects to finish, time for walks with coats and boots, stew on the aga, a little bit of winter is a good thing.

Build 101...why a walk in robe is a great style choice and a great investment

A walk in robe is not just a luxury item, it's an opportunity to increase the value of your home.  It's a chance to get your build dollars working hard for you, and here is why.

Here is why walk in robes are a good investment:
  • Compared to other building expenses it is a relatively small investment in cash and space, and it delivers the wow factor that will have people wanting to live in your house. 
  • You don't need much space to create lots of storage and lots of style.
  • It's a must have item for buyers of modern luxe homes.
  • You will love living with it now, and will reap the financial reward when you sell later. 
You don't need much space, in less than 3m wide you can create your own.  In terms of building costs we are talking around 9 square meters of space.  Much cheaper than putting in an extra room.  Our own walk in is xxxxxx and it's generous both aesthetically and in storage capacity.  The joinery cost around $3,500 not including a premium for the stained oak finish.  

Tailor your finish to your budget, but even with a small budget its possible to deliver a stylish and functional walk in.  See this post by Stylizmo for a glamorous transformation of a small room for around $700.

Have I got you convinced?  See below for my top tips to design your own glam walk in.

Finding inspiration
I don't think you can look past the Italian walk in robe designs (like Poliform) for inspiration.  They are all over both function and form, lots of hanging space, lots of drawers and a crisp, clean contemporary look.  

Plan for all items in your wardrobe
Don't forget to plan storage for items like hats, bags and boots.  

  • I love boots so I designed a shelf that is tall enough for mine to fit into.  No more scrounging under coats and dresses for me. 
  • Open shelves above hanging height are perfect for storing bags and hats which you don't need easy access to every day.
  • Drawers or slide out shelves for accessories, jewellery, belts and ties.
  • Extra shoe space if you have a large collection.
  • Storage space for handbags and hats can be set above hanging space as you will use it less often


His and Hers sides
Our walk in has two sides, His (Mr B) and Her's (moi), and because our clothes are different I designed them slightly differently too.

For him -
  • No full length hanging space, but 3 hanging areas just tall enough to hang suits and shirts.  We even hang t-shirts there is so much room.
  • A large pull out pants rack with space for shoes underneath.  (see how to make your own here)
  • 8 generous drawers, plenty of space for storing ties, belts and even shoes.
For her (moi ofcourse) - 
  • 2 long hanging sections with double drawers below.   I designed the height to fit mid length dresses and coats.  Most of us don't have wardrobes bursting with ballgowns requiring full length hanging space anymore.
  • Shoe shelves and a boot shelf.  Ladies shoes are pretty enough to display and they definitely need their own space.
Take storage right up to the ceiling
We used every inch of our 2.7m ceiling height.  
The area above the hanging space has been divided into two wide shelves.  
  • The lower shelf is easy enough to reach and perfect for storing less used items like hats, bags, or chunky sweaters.  
  • The higher shelf is great for storing blankets, seasonal bedding and in a happy coincidence are the perfect size for suitcases.  
If you don't plan to build all the way to the ceiling, make sure there is enough space on top of your wardrobe for baskets to store seasonal items in neatly.

Finish 
Our walk in robe is finished in black stained oak, gorgeous but definitely a luxury item.  I think it has been totally worth the extra cost, its simple but feels luxurious, glamorous but with a crisp masculine touch.  I love the contrast of the chrome drawer pulls, a tiny bit luxe but not too girly.

The dark wood is lovely in the small space, it makes it moody and intimate.  To achieve something similar on a smaller budget, black painted wood or a good dark veneer would be very effective.

In this budget diy on Stylizmo, Nina has opted for white on white, and doesn't it look amazing.

The more hanging space the better
More is more, I like hanging everything, even t-shirts if I can.
In a choice between extra hanging space and extra drawers choose hanging space, better for your budget too.

Our walk in robe is still one of my favourite spaces.  I get that movie star feeling every time I use it and I would do it all over again tomorrow.  But even better I know it was a great investment in the value of our home.

It's not just about how lovely its going to be to live with now, you will get financial pay back later.  Hope I have convinced you to get planning.  I am going to share the measurements and finishes in my walk in robe in another post.  Until then, have a look at Build 101 for other post to help make your build experience that little bit easier.

simple dinner party...black, pink, gold, succulents

We celebrated the engagement of dear friends recently with a small dinner party at home.  I wanted the table to look really special.  I am loving pink with succulents right now, and teamed up with black and gold it's a scheme that is chic but not to serious.  I love how it turned out.  Scroll down to see how you can create this setting easily and inexpensively at your house.

I recently bought a set of charcoal dinner plates, I just love how the dark colour shows off the food.  These ones were $37 for a set of 12 pieces at Freedom a few weeks ago. 
I already had the plain black table cloth and gold chargers.  I use these chargers all the time, a really good investment many years ago.
I treated myself to new black linen napkins, only $2.50 each at a $2 store which is also where I found the tablecloth.  My only other purchase was a bunch of pink alstroemeria, any soft pink flower would work just as well.  

To set up I picked some succulent stems from the garden and arranged them with a few of the pink flowers in used black glass candle holders. 
Then it's as easy as laying out the gold chargers with a black plate on each one.  Fold each napkin into a neat rectangle and place one on each plate.  Arrange cutlery on top of the napkin.  To easy.

Soft and pretty but still elegant.  Love how it turned out.  Good food, good company and a little bit of prettiness makes the world a wonderful place.

a vintage guide with chairish

I love trawling the auction houses and ebay for a good buy.  There is nothing like the feel of discovering a great value treasure and actually managing to buy it.  I am still mourning the Italian ice glass chandelier I missed out on a few years ago.  I knew it looked good but I didn't know how high to go without over paying.  It might have been mine if I had had a buying guide to help me out.  So I am a fan of this buying guide made by Chairish to help you snag a treasure. Chairish is a fabulous place to shop for pre-loved vintage furniture that other people are parting with.   

Hunt for treasures, or list an item to sell yourself.  I am totally behind reusing quality items, and of course I am always behind saving a little bit of money if you can.  Pop over and see what you can find.  Today I am loving this chair ($347 right now - $1,100 new) this frosted lucite chandelier ($600 seems a good buy) these fabulous brass faux bamboo lamps, I want ($161 for 2 bases!) and this yellow ceramic faux bamboo lamp base ($80!).  

You are going to love this site!

just because it's pretty

The lovely thing about doing flowers for a dinner party is you get to have them around the house afterwards.  These ones migrated to my bedroom.
I am just loving succulents and pink flowers together right now, the black glass makes it just a little more grown up.

Hope you all had a fabulous long weekend.

country cottage...the final bedroom

When we moved into the cottage almost a year ago I only focused on getting two bedrooms ready to use.  There was just to much else to do.  But now that most of the really tough stuff is done, and we are having people to stay a little more, we need to get the third bedroom up to scratch.  I am thinking Scandi meets Ralph Lauren Alpine Lodge.  A little bit of plaid, a lot of white, soft white curtains, a peg rail for hanging a few things up.


Image above left: Kate's Creative Space; above right via Gabriels Webb; top 3 images via Ralph Lauren.
The exciting news is once the room is done our little cottage is going to be available for weekend and holiday rentals.  So watch this space if you want a little getaway in country Victoria.

Build 101...curtains

Today in Build 101 we are talking curtains, or window furnishings as the decorators call them.  You may think all you need to do is choose the fabric, but as always, there are more than a few other decisions to be made.  

Design decisions I would make again
  • Ceiling mounted S-track or ripplefold track system
  • Double curtains: unlined linen in front, black out curtain behind
  • Floor to ceiling generous curtains always always always
Decisions to consider:
  • Curtains should not block door openings when stacked open.
  • Make sure curtains that get a lot of sun are fully lined, are made from sun resistant fabrics, or can stack right off the window.
  • Should curtain tracks be recessed or mounted directly onto ceiling
  • Treatments to block light out when you want to sleep

We have a modern home with wide floor to ceiling windows and door openings.  Wide floor to ceiling openings mean that curtain rod systems have to be ceiling mounted.  In a traditional home there are many options for rods, tracks and blinds.  Decision 1 you never knew you would need to make.

Curtains in traditional rooms stack to each side of the window, this means your curtain rod can have a center support across a wide opening.  In our modern home I wanted extra wide curtains to stack against the walls on a single side of the room.  This means the curtain panel must be able pull right across the track.  Another reason that a ceiling mounted track is more suitable.      Decision 2.

I wanted the curtains to stack off the windows where possible.  Sustained sunlight is not good for fabrics, especially silks and linens.  Window stacking space is really something to consider when the house is being designed.

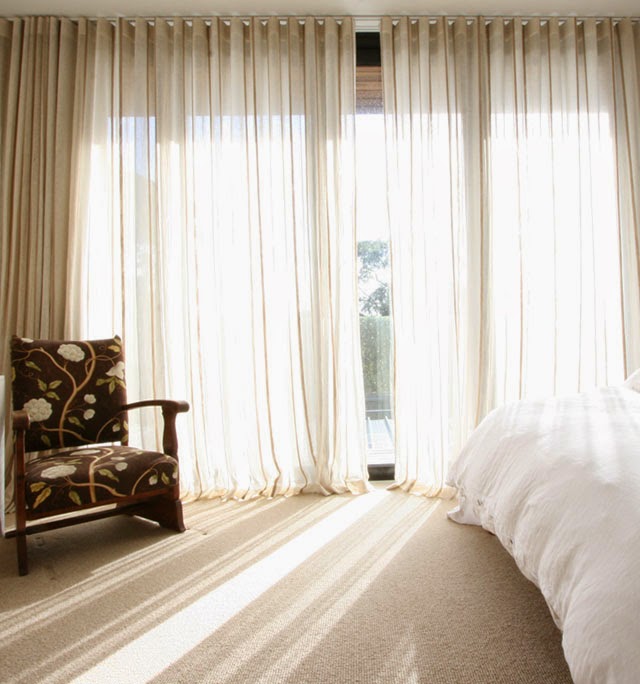
I also knew I wanted linen, great swathes of linen with the sunlight glowing through them.  Such a romantic look.  But I need my bedrooms to be dark, I don't love light when I am trying to sleep.  Our curtain company came up with a great solution.  They suggested a double ripplefold track with two separate curtains.  An unlined linen curtain in front, a black out curtain in white behind (see images above).  Its perfect, the linen curtains can be drawn when I want a soft dappled light or privacy, and the blackout curtains are closed at night and are an extra thermal layer in winter.  The double curtain system was only marginally more expensive than buying lined curtains and I love they way they function, build dollars well spent.  Decision 3

The ripplefold tracks are neatly mounted onto the ceiling, very unobtrusive, and curtains can be pulled from one side right across the opening, and also stack on a single side.  We could have recessed the tracks into the ceiling by dropping the ceilings slightly, creating a shadowline that hides the track mechanism.  To be honest I didn't think about it at the time, its something I would consider in the future if there isn't a large cost and you don't lose much height.
If you lose to much height I wouldn't do it, a high ceiling will win out every time in my book.

See what I mean about all those little decisions you have to make?

For more in the Build 101 series click here, where I share my experience to make your build just that little bit easier.