I did this project over a year ago for She Makes a Home, it was even featured on Apartment Therapy, but for some reason I never shared it here. I still love the fresh colours and it was so simple to make. A lovely project for an evening in front of the tellie.
The inspiration
I spotted a basic embroidery framed up in a children’s design store in Auckland. A simple design, fresh colour palette and blank white space lifted the piece from granny needlepoint to modern must have. But $300! My inner Martha was twitching to have a go.
The Materials- White embroidery mesh .
- 8-10 embroidery wool colours
- Embroidery needles
The stitching pattern- Repeated triangles form squares with two stitched quarters and two blank quarters.
- To create the triangle shape the long side of each triangle must cover an even number of holes or rows in the mesh. I used 22 but suit your size to your design.
- Keep the colour combinations consistent.
- Use your eye to balance the colors, or copy the pattern below
TOP TIP:
If you are using an existing frame make sure that your completed piece will fit before you begin. Place the picture mat over the mesh. Allow for a small gap between the picture mat and the embroidery edge, and mark off the remaining space with sticky tape. Count the number of rows in the taped area and divide by the number of rows in your triangle to make sure the pattern will fit.The Directions
Step 1: Cut mesh about 2cm larger than the final size you want to make. Step 2: Start embroidery about 2cm in from a corner of the mesh. You can make your triangles any size you choose, for mine the long side covers 22 squares of the mesh (see yellow numbers on diagram below). The long side must cover an even number of squares or the tip of the triangle will be blunt rather than pointed. Step 3: Start with longest side first, and follow the stitching pattern on the diagram below (blue numbers) until triangle is complete. Step 4: Choose colors randomly, but repeat color combinations to create a flow of color rather than a fruit salad. Use your eye to balance colors across the piece.
Step 5: Tie off loose threads as neatly as possible on the back of the work.
TOP TIP - Do not cross threads across the white spaces between the stitched areas. They will be visible when the work is framed on a white a backing. Step 6: Once piece is complete iron flat between two pieces of fabric (clean tea towels work well).
Step 7: Stick mesh to back of picture mat with a wide tape. Make sure that it is lying flat and fits with in the frame.Back with white paper or board to make the white space pop.
You can change it easily to suit any size or colour scheme. I like the idea of a long narrow one for over a crib or bed head. You could even use the pattern as a border and embroider a name in the middle. Let me know if you give it a go.
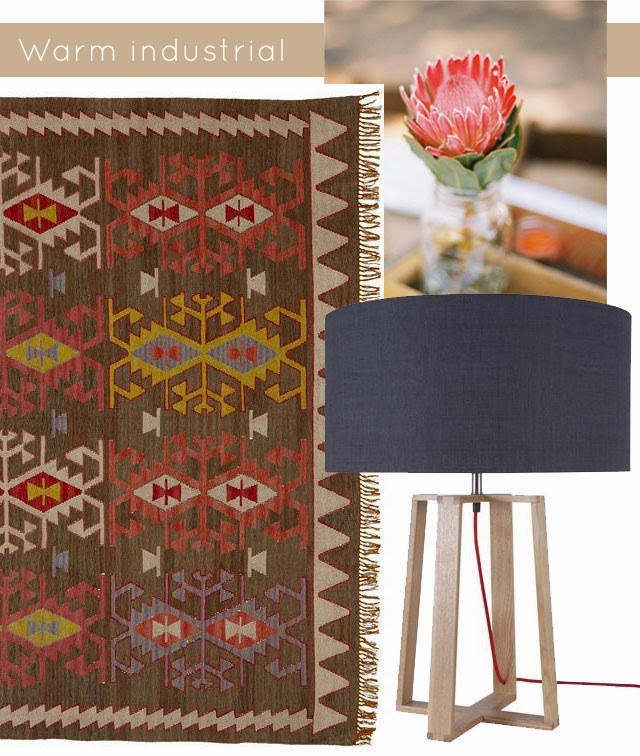
A friend of mine has just rented a new place and is looking for some advice about what furniture to buy. I think rugs and lighting are the perfect starting point, they create a real base for your room and are easy to take with to your next home.
Looking back, the two large kilim rugs I bought 15 years ago have stayed with us through changes of taste, a new family, and multiple homes, they were a fabulous investment. In a rental a rug will also go some way to hiding ugly carpet or tiles that wouldn't be your choice.
Light fittings in rentals often tend to the cheap and nasty. Lamps are a cost effective way of improving the lighting and adding your taste to the space. We had a hideous pendant in our previous rental and the best thing I ever did was replace it. I never regretted the expense of an electrician to take it down, and put it back up before we left.
Buy some simple glass vases (look out for great bargains at $2 shops) and fill with fresh flowers, your space will feel more like home immediately.
Simple peonies, PB Kilim, Titan lamp from Freedom, Wool kilim from Loom, Beaded Chandelier
I am going to be visiting my sister for first time since she moved out of home, and I want to take her a present for her home. So I have been browsing through her Pinterest boards to get a feel for her style. It's been a fun thing to do and there is a definite feel emerging. I love the eclectic mix, warm tones, kilim rugs, grey sofas and layers of textures, cushions and blankets. We must be related. Scroll down to see what my choices for a present are.


From top: Cozy Scandinavian, Bedroom photographed by Romain Ricard, Scandinavian inspired bedroom, grey couch with dark kilim, warm toned living room, brown bottle details, styling master class from Anthology, skull (source unknown), interior by Annabel Gueret, tribal style bedroom photographed by Jaclyn Campanaro, romantic mirror with geometric table, soft grey couch with coral accents
My gift has to fit in a suitcase, be fairly light, and my budget unfortunately doesn't extend to designer chairs and light fittings. But what I will be able to fit in is a lovely throw for a bed or sofa. It's the kind of thing I would love to buy for myself but seldom do, always a little to far down the needs list, perfect for a present. These are my options.
Cable knit blanket with fleece lining, fringed throw, Scandi inspired black and white
I saw the cable knit throws the other day at Pottery Barn and the looked gorgeous, but I always love Scandi style black and white too. Which is your favourite?
Every year Etsy throws a global craft party and we all get to be a part of it. This year on the 6th June people all over the world will be reinventing old photographs in their own crafty way. The same day I heard about the party my cousin sent me so great old photo's she found, it was mean to be. I am taking inspirations from these amazing embroidered photography artworks.Jose RomussiShaun Kardinal reinvents vintage postcards Fab diy for your own project by Brigitte, and an embroidered map for sale on EtsyIf you need inspiration browse the Etsy party board, packed with gorgeous supplies for your own party and photo project, you can even buy old photo's here.
I will be using some of these old beauties, a teeny me with my lovely uncle and his dog, and my beloved granny as a young woman, and experimenting with some embroidery silks and wool. I have some ideas on how to make easy to do and easy to use in your own project.Pop back on the 6th to see my photo recapture ideas and share yours with me at #craftparty on social media. Take it offline and find a craft party being hosted near you, there are tons all over the world, or host one yourself. Make sure you join in, even if its just commenting on the ones you like!!
Perhaps its because its wintery all of a sudden, the light seems cooler and colours faded, shadows are colder. Whatever the reason I am drawn to these images of light and shade.
From top down: Denbyd Design, Cassa Alessia, bathroom detail via Elizabeth Heier, marble pot diy via mydubio, gorgeous living space and must have wolf cushion via trettien.
A good thing our fireplace is going in at last. We are going to be warm and toasty all winter!
Soft and creamy, with a pretty raspberry swirl, this cheesecake is simple to make, impressively pretty and simply delicious! Friends and family are going to love you for giving this one a go.{For the coulis}220g raspberries (frozen or fresh)80g caster sugarJuice of half a lemon (or more to taste){For the cheesecake base}85g shortbread biscuits55g ground almonds45g melted butter{For the filling}600g cream cheese185ml sour cream2 eggs180g caster sugar1 tsp vanilla extract
{To make the raspberry coulis}- Cook raspberries, caster sugar and lemon juice on a low heat until sugar is dissolved and berries are soft.
- Allow to cool, then blend and pass through a sieve.
- Simmer juice over a low heat until coulis thickens (around 10 minutes)
{Make the base}- Whiz shortbread in a food processor until they are a fine crumb.
- Add almonds and melter butter.
- Whiz to combine
- Grease a 20cm spring form tin, making sure to grease all the way up the sides.
- Press biscuit mix firmly into the tin making sure it is spread evenly.
- Chill in fridge while you make the cheese mixture.
{Mixing the filling}- Whizz cream cheese in food processor until smooth.
- Add sour cream, eggs, caster sugar and vanilla extract and whiz again until smooth.
- Pour cheese mix into base.
Pour a small amount of raspberry coulis over the mix and swirl with a clean knife to give the marbled effect (see below). Bake at 140 degrees for 1hr to 1hour and 10 minutes until set.Refrigerate and serve chilled with the coulis.
{Baking tips}- Don't be alarmed when the cheesecake falls once you have taken it out of the oven. It will still be light and smooth.
- As the cake falls it pulls away from the sides of the tin, which is why the sides must be well greased.
- Without the coulis the cheesecake takes about 20 minutes to prepare.
- The coulis takes a little time, around 20 minutes to but could easily be prepared the day before.
Enjoy, and thanks to my lovely friend Helen for this great recipe.
This was supposed to be a beach party, the car was packed, the guests invited, and the heavens opened in a tropical thunderstorm. No beach party! Surprise! the party was at our house instead and I didn't have time to set up a thing. So the next day I set up the beach party in the garden instead, you can see Miss J helping me out below. We will just have to plan another one for the beach.
How to arrange your own layered table wreath- Place hurricane lantern in center of table.
- Lay long pieces of eucalyptus along the table with the stems starting at the center (at lantern). The stems are quite firm and woody creating a great structure to hold the other flowers.
- Arrange other flowers into the eucalyptus, hiding their stems in the leaves. It looks best if the stems all run the same way, pointing towards the center, giving the impression that a bouquet of flowers has fallen over and spilled onto the table.
- Make sure the flowers spill onto the place settings, very romantic and loose.
- Nestle tea lights into the arrangement.
 Choosing colours
 - The grey eucalyptus are a soft base that set off the creamy white garden roses, white berries and pink snap dragons.
- Crisp white table cloth and pink touches to finish.
Fun finishing touches (from my favourite $2 shop)- champagne pink mirror glass tea candles
- pink polka dot napkins
- white plastic plates
- bamboo cutlery tied together (back to back) with pink elastic bands
Half way through photographing the heavens opened again, I never really got a good shot of how pretty the table looked right across. I was forced to scoop everything up a second time. This time I put the long suffering flowers in a vase, and third time lucky we enjoyed our very own picnic in the garden, sitting on cushions on the lawn and surrounded by bees and flowers. There is a real delight in creating these little parties in unexpected places. See my pop up party at home and valentines mini celebration here. The next one will definately be at the beach...
Both of these novels deal with hard subjects, but leave your heart uplifted. Both were actually written for the teen to young adult market but have transcended all boundaries. I love them both.{The Fault in our Stars - John Green}The story of teenagers living with terminal cancer, I know it sounds terribly heavy but trust me, it will make you laugh and make you cry and you will end up loving it.
{The Book Thief - Markus Zusak}Miss E is reading this at the moment, I was worried that the setting of World War II Germany with all its darkness would be to much for her at 11. But the beauty of this book is that it shows the light that remains in simple humanity and kindness even in the most terrible of times. I loved this book.
{See Inside Your Body - Usborne Books}Miss J is obsessed with what is happening under our skins. Where does the food go, what is in your skull, where do all the bits fit, and 20 million other questions. Luckily this book seems to have all the answers and has fun flaps to turn over too. For all the questioning mini minds out there.
This beautiful kitchen eating area landed in my inbox this morning. I thought it was a brochure but its a corner of a kitchen recently remodelled by a good friend in New Zealand. Wish I could pop over for tea and share it with her.
Just shows you how a bold statement can really pay off, I often feel I am far to timid in my design choices. I think the designers of these amazing Brooklyn tin wall papers by merci would love the way she has used it. The shots below are from merci's web page and looks like they have a new range coming too.
Pretty cool! Just like my lovely Kim whose kitchen it is.