Some spaces are just inspirational! Today I am sharing the home of my talented cousin Justine, proprietress of The Broken Heart Repair Shop. Justine has the gift of spotting a great buy at 100 paces, and the even greater one of styling spaces effortlessly and originally. "Curating the lost and found" is how she describes her style and her shop. Watch this space, Justine is going to be working with amazing artists to create a new home wares line soon. Have a wonderful weekend
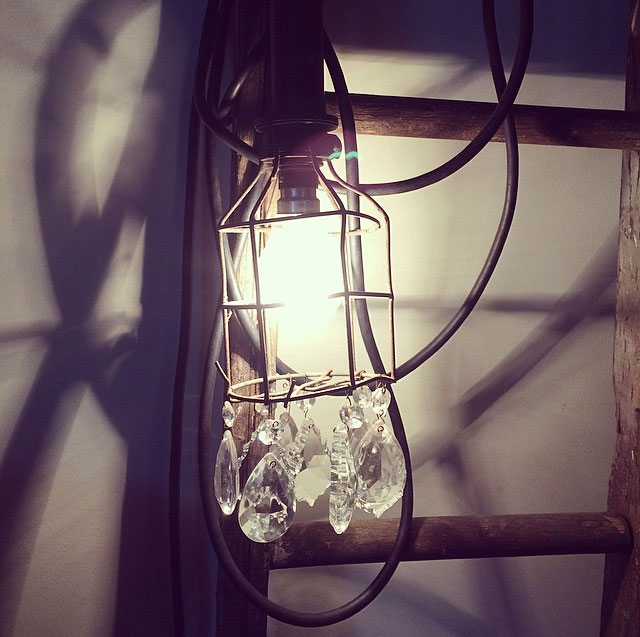
Mission accomplished. From design (below left) to finished installed product (below right). What do you think? I could not be more pleased with them. Click here to see how I made the wooden structure, for more on the cord and installation read on below.
For this part of the project you need 2 extension cords, two lamp holders for pendants with a built in switch, and two lamp shades.Step 1 - "piggy back" extension cordsI bought two 5m "piggy back" extension cords from Bunnings. 5m seems quite long but the next option down is 3m which is to short. I also recommend the "piggy back" version as it means you don't use up all the plug points in your room, because the "piggy back" fitting has a plug on one side, and a plug point on the other.
Step 2 - attach the lamp holdersNext, cut off the socket end of the extension cord. The lamp holders are going to be attached to this end BUT you need to thread it through the holes in the cross piece before putting it on. Hold it up against the wall to make sure you have threaded it the right way. Attaching the lamp holder is as easy as changing a plug. You can see a close up of this type of fitting here.For safety I am not going to explain how, ask your local hardware if you need help.
Step 3 - attach lamps to the wallYou will need to drill two holes (you can see them clearly on the left below) in the wooden upright that you are going to attach to the wall. I used a countersink drill piece so that the screws sit into the wood, I could fill them and paint to get a completely smooth finish but I like how it looks for now.Only drill this hole half way into the wood, then get a bit the same size as your wall screw and drill the hole right the way through. Position the fittings where you want them and mark the wall through these holes so that you have the correct position. Then use the appropriate wall fitting to attach them securely to the wall.
Once they are up you can add your choice of pendant or lamp shade. These ones were $9.99 each from Bunnings and perfect for my white on white scheme.
You could go out and buy one of those pretty colourful pendant cords and use them in this project, but there are two problems. First they are pendants and don't have a plug fitting which means you are going to have to attach one yourself. The second is that the flex cord may be to short for your project remember to measure what you need. If you want to use a colour flex contact an electrical specialist store and they will be able to get them for you.
So I am delighted with the project. I can't wait to do another project soon. Planning planning!
Thanks to Worx tools for letting me test drive the brushless motor drill. I really love it and you can read all about why in the previous post. As always all opinions are entirely my own.
This one is a goodie. You may remember that Mr B made these very gorgeous pendant lamps for our bedroom at the cottage. Well I wanted to have a go too, but clearly my woodwork skills are a little less accomplished so it would have to be a bit more simple. I came up with the design below, two pieces of wood with the pendant threaded through it. A good project for testing my new Worx Tools brushless motor drill. Below you can see my very simple design, two pieces of wood joined at right angles with some long screws & the cord (in yellow) threaded through, finished with a pendant shade.
Two things I have learned from wood work lessons with Mr B.Lesson 1 - the finish is much neater if the edges you are joining are perfectly straight and square.Lesson 2 - Clamps are your friend, clamp your pieces together before you join them, clamp them to the work bench, and clamp in stabilisers. You can never have to many clamps. All this effort is going to keep the wood still while you are drilling & glueing and will give you a much better finish.
So no surprises that clamping everything together is where this project begins.
Step 1 - clamp everything together securely.You can see below I started by clamping the long piece of wood to the edge of the table.Then I positioned the second piece of wood at right angles and used a spare piece as a stabiliser and to make sure the join is exactly at right angles. I clamped the stabiliser to the first piece and then clamped the second piece across the stabiliser. This may sound confusing, just find your own way and make sure everything is held down tight.
Just a quick look at how the finished piece is going to look when it is put together. Tutorial continues below.
So Step 1 was to clamp everything down (below left)Step 2 - Predrill the holes in the piece that will go against the wall, This means you don't have to push so hard when you drill in the screw & in my experience this means I can drill straighter. I also used the Kreg bit to create a countersink hole which means the screw head will sit flush with the wood. When you come to hanging the light this means the wooded upright will be able to lie flush against the wall. You are going to thank me for suggesting this now.
Step 3 - Glue and ScrewPut a little wood glue on the surfaces you are going to join and screw together.
Step 4 - Clamp and let it dryLeave it all securely clamped until the glue is dry and you are done.
Step 5 - Drill the holes in the cross piece for the cordI forgot to photograph this step. Just make sure your bit is a little bigger than the cord. Pretty straight forward.
I am going to show you the finished product and discuss the cord in another post, once it is installed in the cottage bedroom.
I am going to end with some comments on the Worx Brushless Drill that I used for this project.We have another drill, a standard good product used by most trades, and I was given this one by Worx to road test. I love it, and I am not just saying this because it was a gift, my opinions are always my own. But I really love love love this drill. - Firstly the brushless motor means that it is a little lighter than the normal drill which makes it feel better to use, especially if you don't have super muscular arms like me.
- Secondly the trigger has a really good action, it seems to be smoother than my other drill and definately allowed me to apply pressure more steadily which meant I had more control.
- Thirdly, the light is on the base of the handle and shines up at the drill bit, sounds minor but it's just a better position and makes where you are drilling easier to see.
- Fourth, it has a really good driver bit that slots into a space on the handle for quick storage. If you have spent hours hunting for drill bits like I have you will understand why this is a good feature.
- Finally, the set came with two batteries. This means you are never out of power in the middle of your project. Batteries are expensive so a set that comes with two is a bonus.
It is going to look fab so looking forward to sharing the finished piece with you soon.See part 2 of the finished piece here.
Some new pics of Currawong Cottage. Looking so pretty now that it is getting some finishing touches. Lots and lots of trim still to paint but seeing how far we have come gives me the energy to carry on. And very very exciting news!!! If you like the cottage you could spend a weekend there yourself! See our Currawong Cottage website for rates and availability (and because it is pretty too).
We couldn't do any painting this time, it was just to cold and it was taking to long to dry, but we hung curtains, fixed the kitchen counter tops, build a bench seat and finished the entrance, hung lamps and arranged furniture in the third bedroom, added some decorative country pieces, and just generally had fun.
Pop by the Currawong Cottage website and let me know what you think.